Site sections
Editor's Choice:
- Technology and step-by-step instructions for nail gel: steps, rules, process
- White spots on the nails, reasons for what to do, white spots on the nails and folk signs
- Available methods for rapidly increasing blood leukocytes
- Nail and skin fungus will not resist the coffee grounds
- Crocus furniture exhibition. Furniture exhibitions
- Owl tattoo on arm value
- The biggest members in the world
- Fractures of the phalanges of the foot photo
- What is “bad” and “good” cholesterol
- What to do if the skin around the nails dries
Advertising
| Nail extension gel polish step by step instructions. Technology and step-by-step instructions for nail gel: steps, rules, process |
|
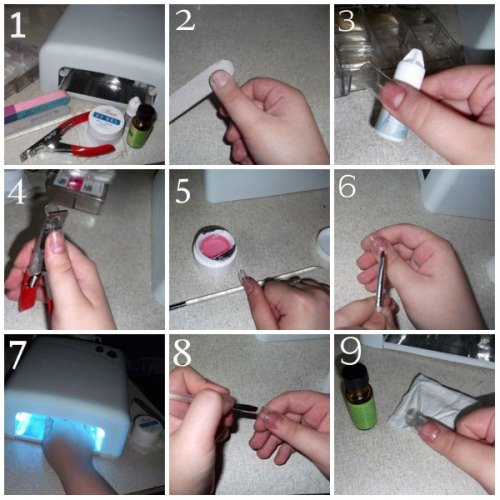
Such a procedure as gel nail extension has already become familiar to many girls. There are more and more masters who master this technology, many of whom work at home. Some study the nail extension with a gel in order to make beautiful and neat nails for themselves, saving money on going to the salon or to a private craftsman. To grow nails, it requires a sufficiently large number of various materials. However, you should not despair, because you can simply purchase a ready-made starter set so that you can make gel nails yourself, following the step-by-step instructions. The ready-made starter kit is quite expensive, so professional masters recommend beginners to type in consumables separately. Gel nail extension technology includes the following materials:
Gel nails in the process of modeling can not do without these tools and materials. They can be purchased in the finished set, where in addition to the minimum list there are additional, not always necessary materials, which still raises the cost of the set. The technique of nail extension is studied in special courses; it is problematic and sometimes unreal to master it yourself only through video lessons and the advice of the masters. Nail preparation
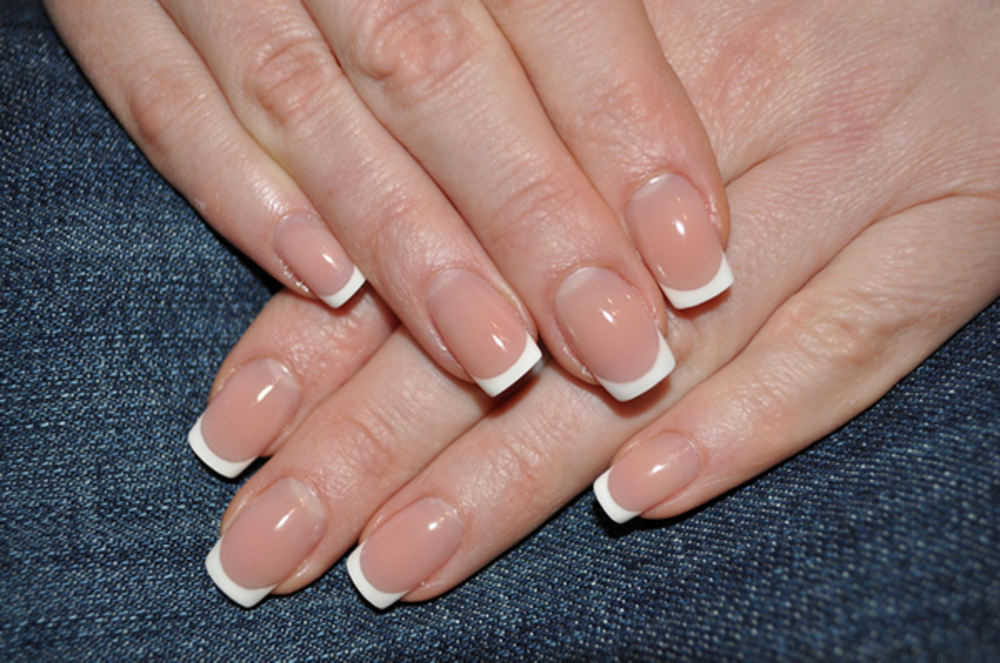
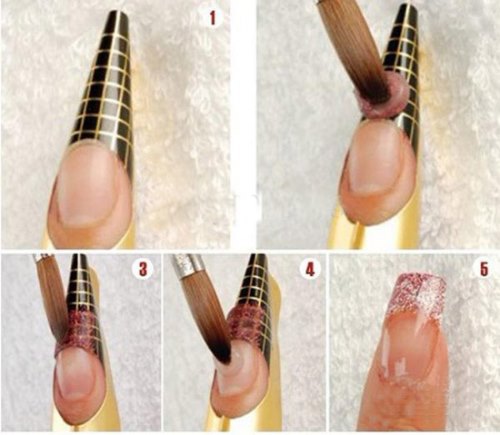
This is the most important stage of building. From how well prepared nails, depends on how long and well they will hold. And how beautiful will be, for example, gel nails french. Below is an example of a classic neat beautiful French manicure with the correct placement of accents and a smile line. Gel nail extension begins with preparation. First, remove the old coating from the nails, saw off the free edge to 1 mm, grind the nail plate. Degreaser removes fatty film, invisible to the eye, applied primer, which dries in the air in just a few seconds. On nail bed a thin layer of a transparent base gel is laid out, which is dried in a UV lamp for only a few seconds. Later the form is given an “arch” with the help of metal tubes. Forms are substituted for 1 mm of the free edge of a natural nail, securely fixed. Technique nail in the salon, for example, does not imply the use of tips, only forms. Therefore, it is very important to know exactly how they need to be properly substituted, cleaned up, used in work. The large detailed video below describes the master class on building up, where it is shown how to set up the forms so that they do not fly during the procedure. In order to really grow nails, it is impossible to touch the nail bed after applying the primer. This is the only way to ensure good adhesion of the material and the natural surface. Building upTo gel nails were strong, you need to choose the right length. Owners of a short nail bed is better not to count on very long nails, which under their weight and size can break at any time. Gel nail extension technology involves laying out the substrate in the form that will be the free edge when modeling. So, for example, it can be a soft square, which is successfully made with a glitter jacket, and maybe a gentle “homemade” stylet.
The substrate is never dried in the UV lamp for a long time - just a few seconds for the material to “grab”, but not dry. After the substrate grabs, remove the form. At the same time, if necessary, the nail is pressed with tweezers so that it takes the correct form. Camouflage gel is spread on the nail bed, if French manicure is performed next. After drying the material in the lamp, it is carefully sawn and polished, then a free edge is formed. If we are talking about such a concept as gel nail extension under a varnish, then nail modeling takes place differently - the material is laid out immediately on the entire nail. After the formation of the entire nail, it is carefully sawn and polished, covered with painting, if necessary, fixed with the help of a top with a dispersion layer or without it. It is advisable to apply oil on the cuticle. It is important to know in detail what is the sequence of gel nail extension in order to properly perform the procedure. One missed stage and the nail will break upon impact or grazing. The video shows how easily and quickly the master in the cabin copes with its task, modeling nails at ease, in compliance with all rules and regulations. It is necessary to apply the material on the nails so that the model was as close to natural as possible - not flat, but convex, with the correct apex and a smooth smile line. To achieve this from the first time is quite difficult, so the masters spend a lot of time training. And many still wonder how to properly build up the nail gel. First of all, you need to choose a good material. One that will not spread, and easily stretch along the surface. Secondly, it is advisable to keep the marigold tilted so that the excess gel is bound to the free edge and not to the cuticle. And, of course, the material should not fall on the skin, otherwise there will be detachments and air "pockets", where there is fertile soil for the development of bacteria. It is advisable, before building up gel nails for yourself, to take courses at the master, otherwise there is a risk of causing injury to natural plates.
If the nails are irregular or not long enough, you can increase them with the help of a modern procedure for building a gel. It is convenient, fast and beautiful. To do this, use a variety of ways to build. Of great importance for the final result and convenience of work is the choice of gel for nails. Jelly gel for nail extension (where to buy, features)Its structure is an air mousse. It perfectly keeps on a brush and does not flow down. The gel remarkably lengthens the natural nail plate and hides all defects. Shades are represented mainly solid, beige and pale pink. White gel is used for french. Jelly Gel Features:
Since it is complex in sculpting compared to UV gel, it is poorly leveled. To date, the gel is presented in sufficient range in online stores. Buy it will not be easy. The main thing is when choosing a manufacturer to see reviews to avoid buying low-quality goods. Cosmo gel for nail extension (where to buy, features)Cosmo is a Polish camouflage gel.
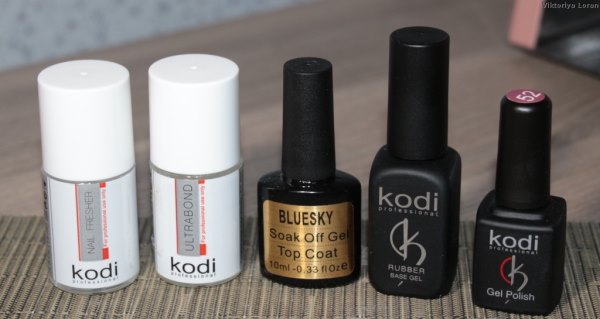
Gel for nail extension Cody (where to buy, features)
It has its advantages.
Note! Although some have a watery texture, this is not a serious obstacle. The brand is spread all over the world and ranks first among manufacturers of gel formulations. Any master can purchase the products of the company Cody in any store that sells products for manicure. What you need for nail gel: listOnly properly selected inventory will provide quality coverage. 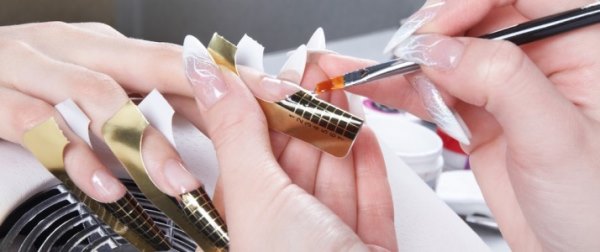 Tools used in the process of modeling nails:
Necessary materials:
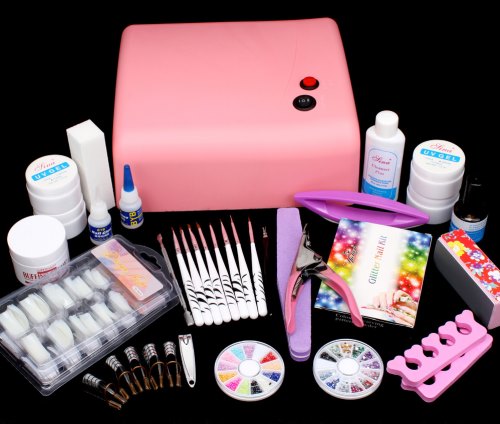
Before buying read reviews. If the materials are of poor quality, the manicure will be short-lived, and its creation will be time consuming. Starter kit for nail gel, where to buyFirst of all, the contents of the set depends on the price. Often brand manufacturers put up starter kits for sale. Sometimes they are formed in the warehouses of online stores and are sold as an exclusive offer.
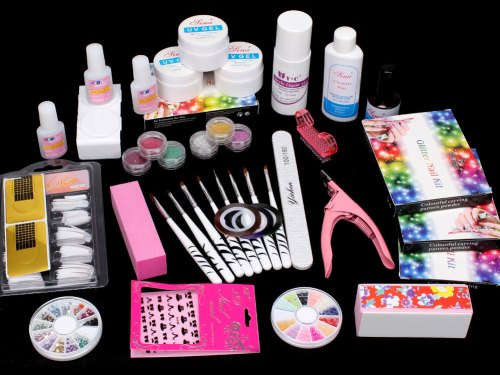
You can create a set yourself, but it is desirable to purchase ready-made kits, this will greatly facilitate the work. In addition, the materials and tools in such kits are often intended for non-professionals. The starting set of tools for nail modeling includes:
Some starter kits come with instructions. Before buying does not hurt to carefully examine the equipment. Gel nail extension - step by step instructions with photosSome newcomers are interested in whether the gel varnish is built up and where to find walkthrough. So, gel polish is a decorative coating, they do not build it, for this purpose they use a special gel.
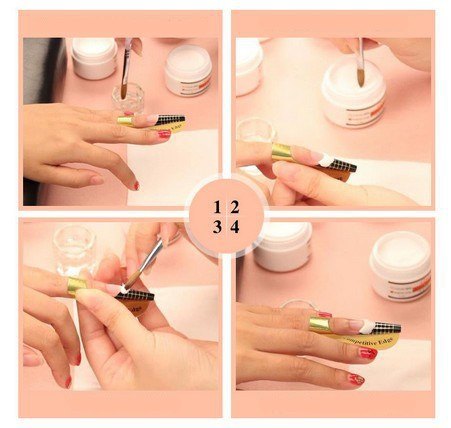
As it was already possible to understand, either tips or forms are used as the basis for the gel. Let us consider in detail how the build-up process is carried out in either case. First you need to choose a place with good lighting, while halogen lighting is not suitable, otherwise the gel will start to harden quickly. Nail extension with gel on forms (step by step instruction)Step-by-step instruction:
Gel nail extension on tips (step by step guide)The sequence of the process:
Gel nails without buildup
First, the cuticle and nails should be treated with an antiseptic.
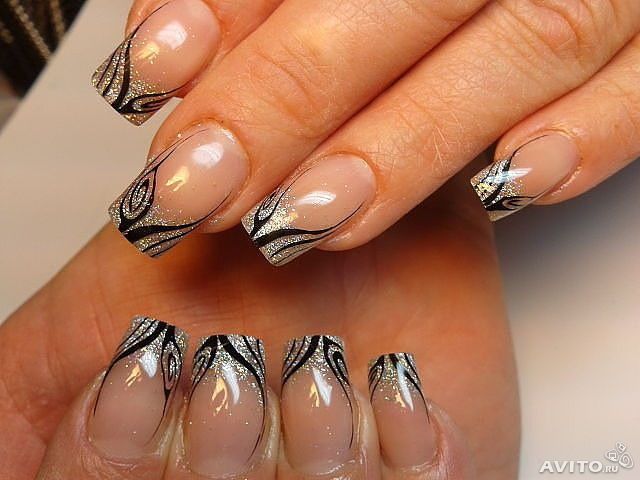
Gel nail extension technology: french - beautiful and stylishFrench is created using two layouts and hand-drawn technologies. In the first case, the tip of the nail is done with white (or another color) gel, in the second case, it is drawn with gel-paint or varnish on the finished nail. Layout technology:
It is important to know! If you want to give the effect of glossy shimmer, then apply pearlescent gel. Single phase gel for nail: how to use (technology)The technology of application is as follows:
Gel nail extension at home: step-by-step instructions for beginners
Self building is carried out as follows:
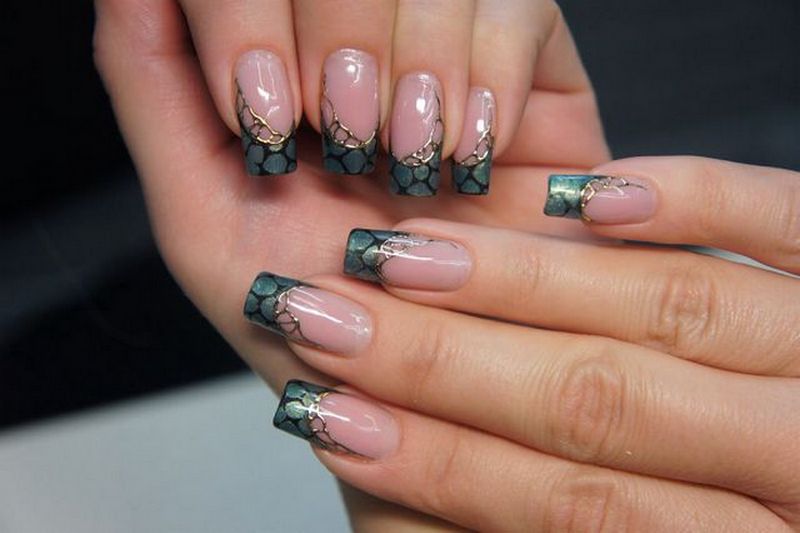
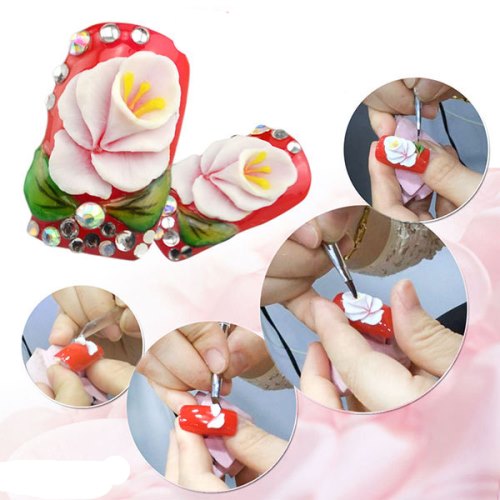
Gel nail extension: photo with various designsOptions for building and decorating a lot of nails. Consider the most popular. 3D modelingThis is not an easy way to nail design, as long-term work is needed. Gel for 3D modeling holds its shape remarkably well, it does not crack and does not spread.
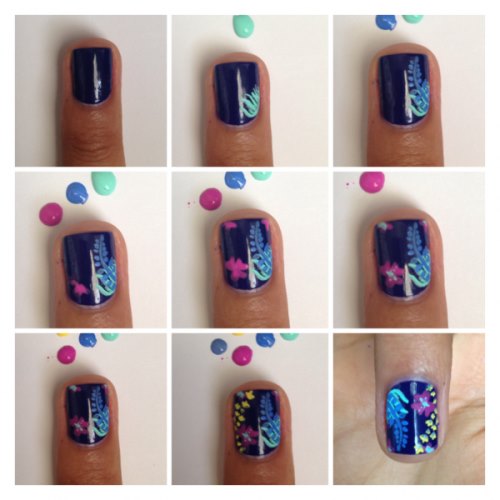
Of course the process of performing 3D modeling is very laborious. Each layer is not complete without painting or accessories in the form of acrylic flowers, curlicues, decorations, which are formed by a brush. Art paintingToday it is the most frequently used technology for decorating nails. In this design, gel polishes, watercolor, acrylic paints are used.
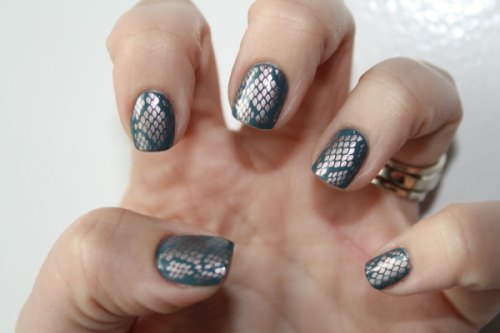
Drawings are applied with a needle, thin brush or sponge. To create a geometric pattern, use strips on the basis of glue. The most frequently used designs include Zhostovo, Chinese, Gzhel. Stamping manicureTo apply the pattern on the nails, apply a specially created plate-stencils. This is probably the easiest way to create a complex and interesting design. Stamping manicure looks bright, catchy, spectacular.
Often, stamping is used to model a wedding manicure in the form of lace. The leader among manufacturers is Konad. Combined designA professional nail art artist can masterfully combine various types of design at the same time.
The result is a very beautiful manicure options. How much does nail gel in the salonOn average, the price of increased gel nails in the salon varies from 1,200 to 6,000 rubles. In some stores, this price does not include, for example, design. It is paid separately and depends on the complexity. If the price in the salon is less than 1000 rubles, then most likely the client will receive poor-quality and unstable manicure, as in this case cheap and low-quality materials are used. Gel nail extension: video tutorials for beginnersThe training video building gel nails from scratch. Video tutorial for beginners How to grow nails: instructions for dummies. Watch useful video: Many girls dream of long nails beautiful shape, but for various reasons to achieve such a result on their nails, not everyone succeeds. To realize this dream, one of the popular manicure technologies will come to the rescue - gel nail extension on the forms. Gel extension allows you to select the desired shape of the nail with the help of special templates. These nails look natural and stylish. The gel allows you to make them strong and durable, to hide the flaws and irregularities. Disposable. This form is made of paper, foil or flexible plastic. Its advantages:
Reusable. Presented in the form of a stand made of metal or hard plastic. This form is more expensive, but is used for a long time. Gel nails on the form may vary in technology:
Grown nails, unlike acrylic, look more natural. The gel does not penetrate deep into the nail plate, and therefore less harmful. The advantages of the gel over acrylic are that it dries longer. This allows you to make building more accurate, as it is easy to correct the unsuccessful coating. The disadvantage of gel buildup is the fragility of such a coating. Violation of the procedure technology can lead to cracks and rapid detachment of extended nails. These nails after cracking the gel can not be repaired. How to grow nails gel on forms: the main stages
For a successful procedure, you need to know how to increase the nail gel on the forms. To this end, it is advisable to visit the salon, where such capacity will be done professionally. Salon procedure will undoubtedly give a good result. However, if the nail is done constantly, you can master this technology for self-fulfillment in order to save. To carry out the extension procedure you will need:
How to increase the gel nails on the forms:
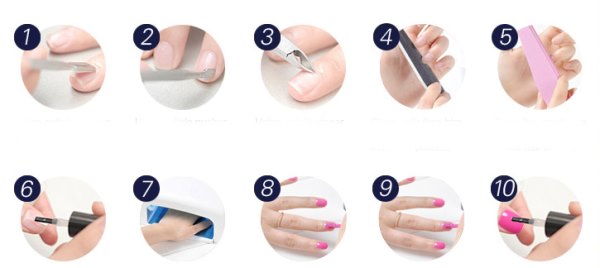
When the nail grows, it is possible to make a gel correction. When flaking off the gel, it is necessary to remove the accumulated nail. You can not seal exfoliated gel, as this can lead to serious diseases of the nails. One of the most striking indicators of how a woman appreciates and loves herself is her beautiful, neat and well-groomed nails. It is also one of the most important requirements for creating an image of a successful modern woman. But, sadly, unfortunately, nature is far from giving us all long and strong nails. But sometimes you want to decorate them, for example, with a subtle pattern or cover them with picturesque flowers. But what if the nails are too short, and it is unlikely that they will be able to carry out their plans? In this case, nail extension with the help of a gel comes to the rescue. In fact, nail extension with the help of a gel is a way to increase the length of the nails, or to change their shape by coating the nail plates with artificial materials. These materials make the nails beautiful and durable, and, moreover, they can not be distinguished from the natural. Gel nails can be given any shape, and at the same time they always look natural, stylish and fashionable. The basis of the technology of nail extensions gel is a special material - gel, quickly hardening under the influence of ultraviolet rays. It is for this reason that the gel nail extension technique assumes that nails made from this material should be exposed to a special lamp with an ultraviolet spectrum of rays. In the same way as acrylic nail extension, gel nail extension can be carried out on forms or on tips. Depending on the type of material used for nail extension, there are several extension systems. Three phase system extension is the extension of nails with the help of three components, each of which performs its function: in the first component it is the gel adhesion to the nail, the second component is responsible for modeling, and the third is necessary to ensure durability. Two phase. In this system, one component is responsible for adhesion and modeling, and the other is responsible for the strength of the nail. Single phase system. There is only one drug that performs all the basic actions needed - grip, modeling, and strength. Step-by-step instructions for nail gel.We'll talk about the differences in nail extension technology on tips and on forms a bit later, and now we will be presented with a general instruction on nail extension with gel. It should be noted that in this way they grow nails using a three-phase technique, and depending on the materials used, the techniques may differ somewhat from each other. So, let's begin.
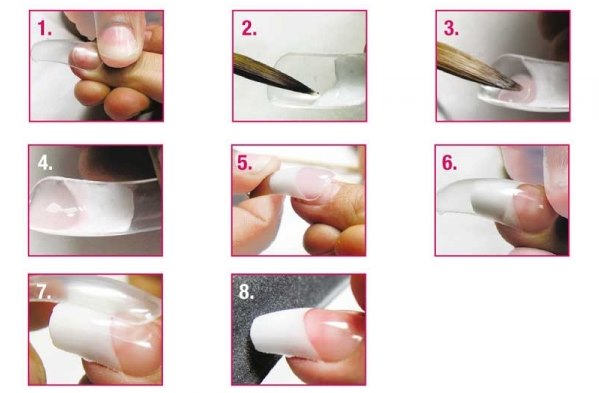
Creating a nail is completed, you can now begin to apply the picture. Stages of nail extension gelHow usually happens step by step gel nail extension, we have already talked. Now consider the main stages of nail with tips and with the help of forms. Tips are artificial nails that are available in various shapes and sizes. With the help of special glue, tips are attached to natural nails, however, they should not cover more than half of its surface. After gluing the nails gel is applied to the nails. This method It is popular because it suits almost everyone. Moreover, even if the client has his own nails very short, building up on tips is still feasible. Nail extension with the help of forms - this is actually building with the use of a special stencil, made of almost any material. Technically, everything is done quite simply - the form falls on the nail so that the existing window is exactly under the edge of the nail. After that, a gel is applied over the stencil evenly. After complete freezing of the gel, the form is removed. In contrast to the nail extension with gel on tips, with this method it turns out like a continuation of a natural nail. However, this method has one drawback, because of which this technique cannot be used by everyone - the client’s nails should be long enough. There is another method by which gel nail extension is performed without the use of tips and forms. If the nails have a sufficient length, however, they break and stratify, then their strength can be significantly increased by simply covering them in several layers with a gel. In such a case, the use of tips and forms is not required. The rules of nail gel.If you want that later there would be no problems with your gel nails, regardless of whether you are doing this procedure in the cosmetology salon or independently, you must follow certain rules. Only the observance of these simple recommendations will allow to carry out the correct gel nail extension.
Gel extension today is considered the most common. This is not surprising, since gel, unlike acrylic, does not smell in the process of working with it, it does not cause allergies, and it looks more like real nails. The surface of the nail, provided that the procedure and procedure for nail gel were observed correctly, will be smoother, more even and shiny. At the same time, gel nails are more fragile than acrylic, and with a significant temperature difference, they can crack. At the same time, these nails are not subject to repair. So, summarize the pros and cons of gel nails. Advantages of gel nails:
Disadvantages of gel nails:
The bulk of the acetone gels used for nail extensions is stable, and therefore it will not be possible to remove the gel with a solvent. Acetone-resistant nails can only be removed by cutting them layer by layer, and this is a very lengthy and tedious process. With this information, you can always determine for yourself what is best suited exactly in your particular case - gel nail extensions or nail extensions using acrylic. All girls dream of graceful fingers with flawless nail plates. But, unfortunately, nature has its own opinion on this, and natural beauty can be completely different from the ideas of modern fashionistas. To help all the representatives of the beautiful half of humanity, a modeling procedure was invented, thanks to which it is possible to give their plates the desired shape and length. If earlier this art was available to very few, then with the advent of video instructions for nails on the forms, each of us had the opportunity to master it perfectly. Gel modeling is a simple and interesting technique. After reading our article and viewing the training plots, you can quickly master the art of creating beautiful nails from the gel. Advantages of gel buildup on formsThe wide distribution of the video on the nail gel on the form due to the fact that this procedure has a huge number of advantages. With its help it is possible to mask various defects of the plate, to protect it from mechanical damage and just make it more graceful and attractive. This material is easy to use, affordable and harmless. The gel has a viscous consistency, natural luster and the ability to evenly spread over the surface. After reading the instructions, even beginners quickly grasp the essence of the methods of building on the forms and reproduce them without any problems. Artificial plates of this material can be decorated with any decor, and they serve at least 3 weeks, after which they are quickly removed by cutting. Design options Beginners face certain difficulties when choosing the shape of the future plate. According to the opinion of professionals, the view should be chosen in this way:
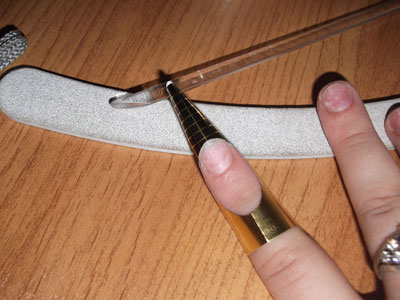
There are other types of outlines of the nail plate. But all of them, one way or another, belong to one of the categories listed above. Techniques of modeling nail platesThere are two main types of gel extensions: with the help of paper devices with an oval cut in the middle and plastic. Most often, the wizard uses the first option. The technique of modeling with the help of upper plates has already begun to gradually replace the traditional one. There are more and more videos on the Internet for learning how to build up gel on top forms. The technique is gaining popularity because it does not involve the painful filing of artificial plates. Due to this, the elongation procedure is shortened. Consider the technique of artificial lengthening on the upper devices. The whole process consists of the following steps:
The procedure is quite simple to perform and is available for home use. The following video shows how to use the top forms step by step. With such a lesson it will be easier for you to master the technique of modeling. To learn how to make nail extensions on forms in the style of "French", you also need to watch the video we prepared and practice. The next lesson will demonstrate the technique of modeling a smile zone with a gel. Adherents of the classic technique is worth watching the lesson of Elena Dzyk. In her lesson, she will reveal the secrets of modeling with disposable extensions. A detailed step by step description will help beginners and just amateurs. Modern girls like nail form "pipe". Therefore, the following video lesson on modeling tubes at a free edge will be useful for future manicurists. Many professionals with high qualifications mastered the build-up on the forms for video. They allow you to learn how to model “oval”, “square”, “spikes” and other common nail shapes, as well as make french, gradient, aquarium manicure, etc. Unfortunately, in practice it does not always work as shown in the video. Have you encountered such problems? Share in the comments your learning experience on the subjects of other masters. This information will be very useful for beginner manicurists. |
| Read: |
|---|

New
- Sequence of procedures
- The program of intensive moisturizing of the skin on cosmetics bark
- What you need for acrylic powder
- What does owl mascot mean
- Analyzes for pancreatitis: what research should be done and what indicators show
- Owl - a talisman to attract money and good luck
- What bird screams at night with a kitten's voice?
- Cholesterol and stress
- Manicure at home
- Effective facial


