Site sections
Editor's Choice:
- Technology and step-by-step instructions for nail gel: steps, rules, process
- White spots on the nails, reasons for what to do, white spots on the nails and folk signs
- Available methods for rapidly increasing blood leukocytes
- Nail and skin fungus will not resist the coffee grounds
- Crocus furniture exhibition. Furniture exhibitions
- Owl tattoo on arm value
- The biggest members in the world
- Fractures of the phalanges of the foot photo
- What is “bad” and “good” cholesterol
- What to do if the skin around the nails dries
Advertising
| Building a three-phase gel step by step. Technology and step-by-step instructions for nail gel: steps, rules, process |
|
Manicure is one of the most important accessories for women! Many representatives of the fair sex choose nail extension with gel and get an excellent long-term result.
Many girls prefer gel due to its following characteristics:
If we talk about the drawbacks of the extended nails, then there are not so many of them: a long time of the procedure, a small fragility and a long removal. If the master does not know how to properly grow the nails with gel, then various negative consequences of the manipulation are possible. In some cases, incorrect actions can damage the nail plate. Gel nail extension technologyThere are 4 types of gel nails:
Paper forms are superimposed on the nail plate, and the gel creates the shape and length of the client. Then it is still polished and polished. When building nails with the help of upper forms, they are superimposed on the prepared surface and are held until they solidify under an ultraviolet lamp. Liquid tips made with a special mold are applied to 2/3 of the nail plate. After polymerization, the reusable stamp is removed and ready tips remain on the nail surface. Then everything is covered with gel and kept under the UV lamp until it is completely cured. The phased gel nail extension technology with the help of tips presents some difficulties for beginners. But if you want, anyone can master it if they acquire special tools and materials. How to properly grow nails gel on tips
Whatever one may say, it is best to turn to the master, as he knows the correct sequence of nail extension, has all the tools, and also has an equally important thing - experience. The sequence itself is simple, but if you do not know all the details, then the nail plate can be very easily damaged. Design on the extended nails
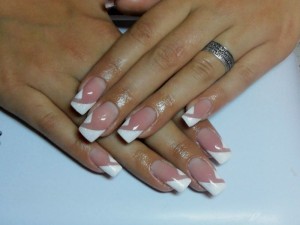
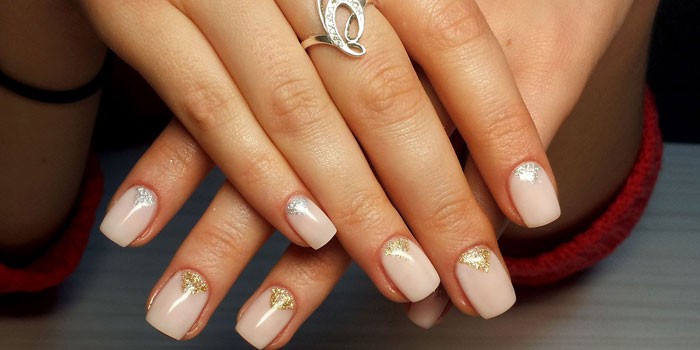
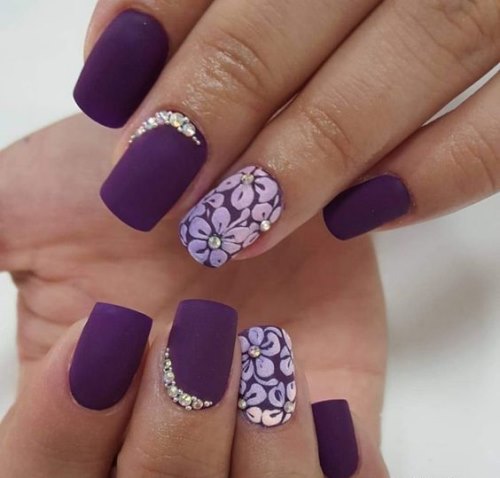
Aquarian design on the extended nails. Very interesting and beautiful style that will help to stand out from the crowd (photo 2). Bas-relief design. With the help of bright colors and rhinestones will make the enlarged nails irresistible (photo 3). French A practical, versatile and simple style of painting will add femininity and style to any girl (photo 4). Monochrome coating. Red, blue, black, brown, green, coral, yellow and other colors will look very good on extended nails and will give you a great mood (photo 5). The price of increased nails and care for themEach master has his own gel nail extension technique, developed over years of experience and improvement. How much is the procedure on average? To such a manicure long and faithfully served, it is better to turn to professionals. Their price for gel nail extension varies from 1,500 to 2,000 rubles. At first glance, a bit too much, yes? But the result will be very pleased. The gel will last from 2 to 4 weeks depending on how quickly the natural marigolds grow. Of course, there are more economical options for extended nails. It is not necessary to go to a professional salon to get beautiful gel nails. Simply ask around friends and acquaintances where and what price. You can find very low prices, like 150-200 rubles. There are masters who work for both 500 and 600 rubles. You just need to ask. To maintain the beauty and smoothness of the nails, you need to follow some rules:
New nails, which are enlarged with gel, can easily break if you gnaw them, tap them on the table, do not use gloves when cleaning. Gel marigolds can be periodically polished with a special file with an abrasiveness of 100 to 100. To remove varnish, use only those products that do not contain acetone. It is recommended to apply on a surface only a qualitative decorative covering. It is necessary to regularly check the condition of the manicure with the master and correct it if necessary. It is advisable to consult with a professional and buy quality tools. These can be various oils or gels. They slow down the growth of the cuticle.
Well-groomed hands are the business card of every lady. , the step-by-step instruction of which will be considered further, it is possible to produce not only in the cabin, but also at home. Artificial nails can be decorated with fashionable murals of multi-colored varnishes and rhinestones. Technique nail gelGel is a natural polymer with a porous structure. This material does not harm the natural nails. Gel nail extension technology is simple, but it has its own characteristics, depending on the type of gel. Gels are of the following types:
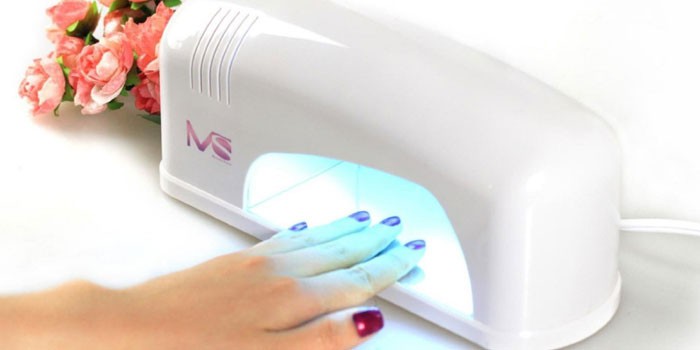
The first type of material hardens under the influence of ultraviolet rays. This requires the presence of a lamp of ultraviolet or halogen radiation. Such gels are odorless, easy to apply and easy to clean. This coating is applied in two layers, keeping each of them under the lamp. Gels that do not harden under UV light have a more dense structure. Their drying contributes to the catalyst - a special substance that creates a chemical reaction. Gels have the following positive properties:
Disadvantages of helium material:
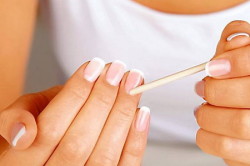
Back to table of contents Instructions for nailIt is very difficult to carry out the procedure yourself, preferably with a professional expert. Before you study the lessons on building artificial nails, you must examine the hands: they should not be cracked, bruised, wounded. Gel nail extension technology:
To simulate the plate, giving it strength and shine make nail extension gel. This procedure helps to adjust the shape, make the design of any complexity. The extension is suitable for those who have weak nails, who cannot grow the desired length and those who do not like to paint their nails very often. Gel nails look beautiful, shine, no different from natural. Technique nail gelThe technology of nail extension is based on the use of a special gel material, which hardens under the action of ultraviolet rays in a compact lamp. Due to the gel, the surface of the plate is leveled, glossy shine is given, the cuticle and the skin around are not irritated. Overhead tips are transparent, similar in structure to natural nails, they can be given any shape or design. On tipsA popular extension technique is the use of tips - artificial plates, different in shape, color, size. They are glued to their own plates, then covered with gel. It turns out that tips continues the shape of the nail, is part of it. The extension method using tips is suitable for everyone, even girls with very short own nails. Gel buildup on formsOn the lower or upper forms there is a gel nail extension, in which special patches are placed on the plate. Already on them the master puts the material. The advantage of this procedure is the easy removal of forms from the nails after extension, plus the naturalness of the manicure. To remove such coverage at the end of the shelf life is also easier than artificial tips. Advantages and disadvantagesSupporters of beautiful gel manicure argue that it is comfortable to wear because of the hypoallergenic materials, lack of skin irritation, gel odors. The components allow moisture, air and light to pass through, protect the plate from fungi, do not block its breathing, and hold on for a long time. Gels are easy to use, do not peel off, do not require strong filing, have good adhesion and are multifunctional. With their help, you can sculpt any elements, do french. The disadvantages of manicure include: Types of gelMasters at work use three gel varieties that differ in functionality and number of layers:
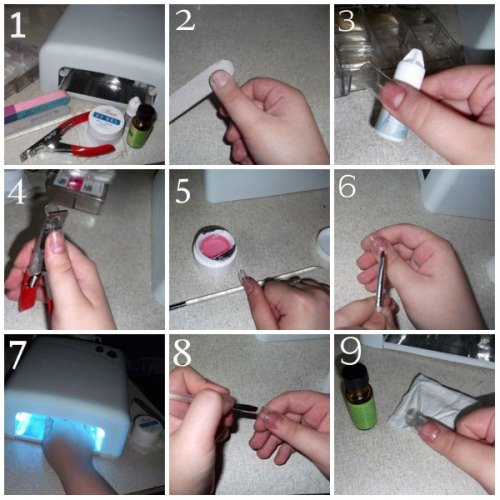
Materials and toolsMasters have a whole arsenal of materials and tools for work. Sample list of used items:
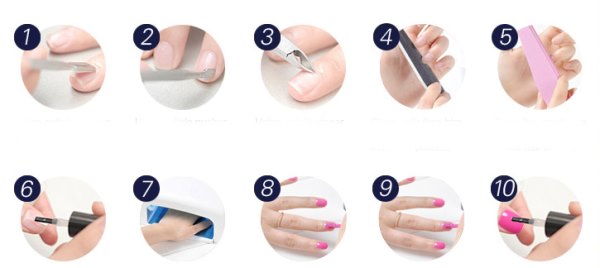
Gel nail extension - step by step instructionsWhen performing the technique of nail buildup gel allocate step-by-step work steps that differ in function and duration:
Care after the procedureIn order for the build-up to be successful, the client must follow several simple rules on the day of the procedure or in advance:
The rules of care for extended gel nails should also be observed as strictly as possible, so that the result pleases longer:
If the nails are irregular or not long enough, you can increase them with the help of a modern procedure for building a gel. It is convenient, fast and beautiful. To do this, use a variety of ways to build. Of great importance for the final result and convenience of work is the choice of gel for nails. Jelly gel for nail extension (where to buy, features)Its structure is an air mousse. It perfectly keeps on a brush and does not flow down. The gel remarkably lengthens the natural nail plate and hides all defects. Shades are represented mainly solid, beige and pale pink. White gel is used for french. Jelly Gel Features:
Since it is complex in sculpting compared to UV gel, it is poorly leveled. To date, the gel is presented in sufficient range in online stores. Buy it will not be easy. The main thing is when choosing a manufacturer to see reviews to avoid buying low-quality goods. Cosmo gel for nail extension (where to buy, features)Cosmo is a Polish camouflage gel.
Gel for nail extension Cody (where to buy, features)
It has its advantages.
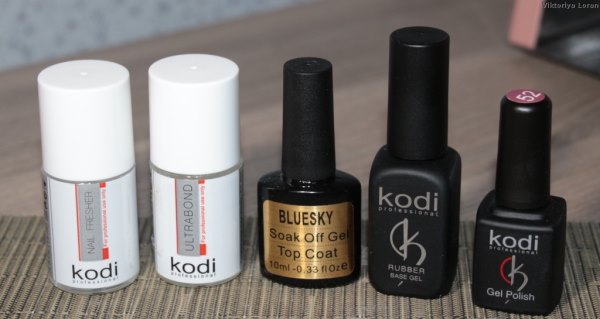
Note! Although some have a watery texture, this is not a serious obstacle. The brand is spread all over the world and ranks first among manufacturers of gel formulations. Any master can purchase the products of the company Cody in any store that sells products for manicure. What do you need for nail gel: listOnly properly selected inventory will provide quality coverage. 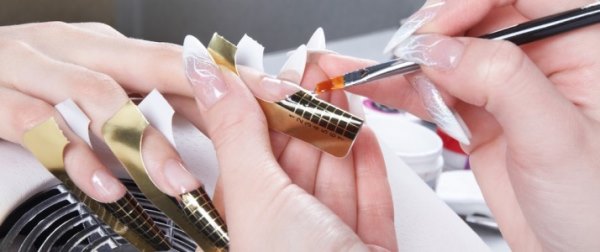 Tools used in the process of modeling nails:
Necessary materials:
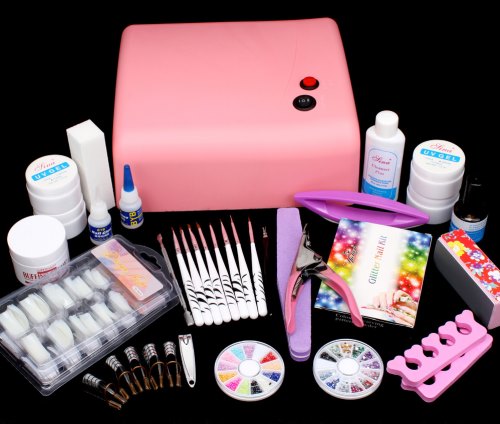
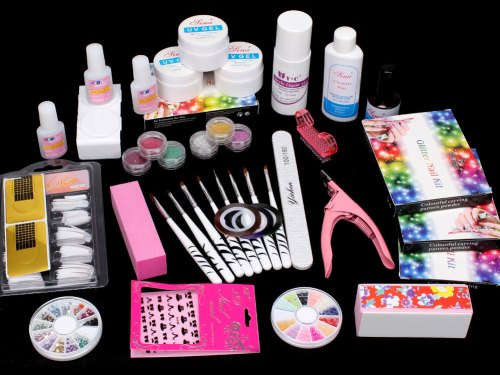
Before buying read reviews. If the materials are of poor quality, the manicure will be short-lived, and its creation will be time consuming. Starter kit for nail gel, where to buyFirst of all, the contents of the set depends on the price. Often brand manufacturers put up starter kits for sale. Sometimes they are formed in the warehouses of online stores and are sold as an exclusive offer.
You can create a set yourself, but it is advisable to purchase ready-made kits, this will greatly facilitate the work. In addition, the materials and tools in such kits are often intended for non-professionals. The starting set of tools for nail modeling includes:
Some starter kits come with instructions. Before buying does not hurt to carefully examine the equipment. Gel nail extension - step by step instructions with photosSome newcomers are interested in whether the gel varnish is being built up and where to find a step by step guide. So, gel polish is a decorative coating, they do not build it, for this purpose they use a special gel.
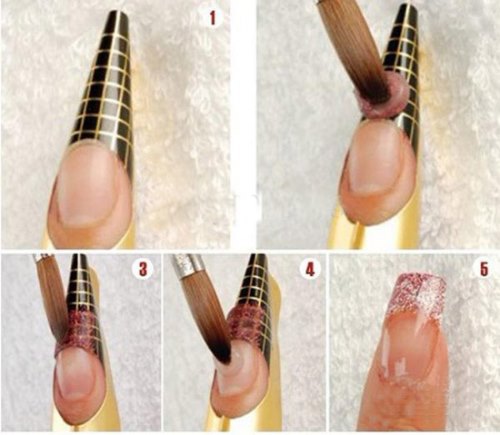
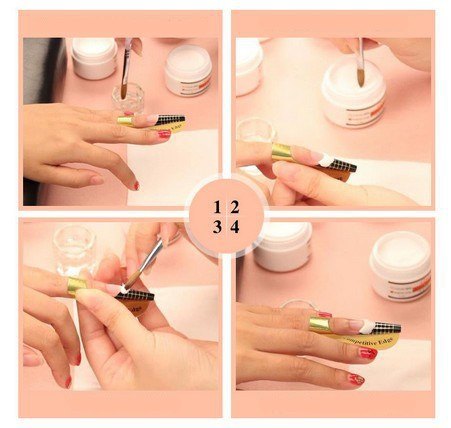
As it was already possible to understand, either tips or forms are used as the basis for the gel. Let us consider in detail how the build-up process is carried out in either case. First you need to choose a place with good lighting, while halogen lighting is not suitable, otherwise the gel will start to harden quickly. Nail extension with gel on forms (step by step instruction)Step-by-step instruction:
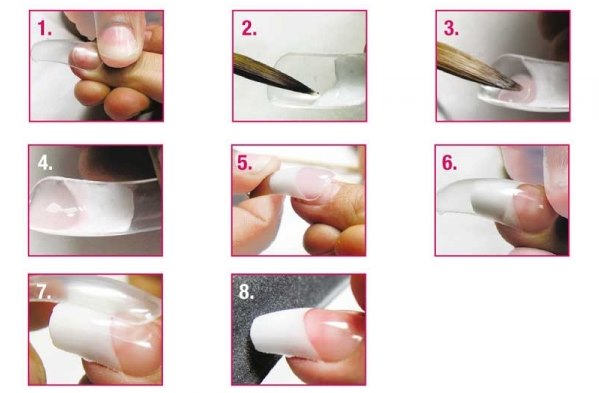
Gel nail extension on tips (step by step guide)The sequence of the process:
Gel nails without buildup
First, the cuticle and nails should be treated with an antiseptic.
Gel nail extension technology: french - beautiful and stylishFrench is created using two layouts and hand-drawn technologies. In the first case, the tip of the nail is done with white (or another color) gel, in the second case, it is drawn with gel-paint or varnish on the finished nail. Layout technology:
It is important to know! If you want to give the effect of glossy shimmer, then apply pearlescent gel. Single phase gel for nail: how to use (technology)The technology of application is as follows:
Gel nail extension at home: step-by-step instructions for beginners
Self building is carried out as follows:
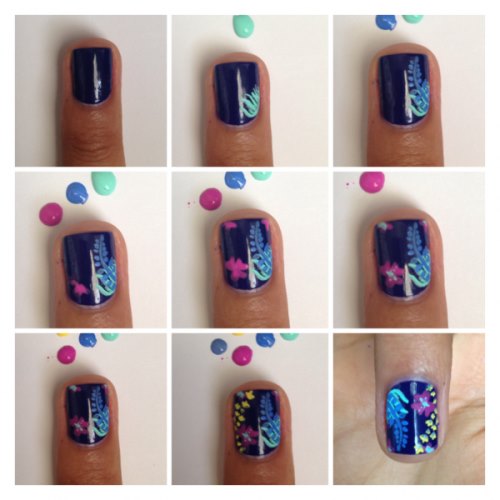
Gel nail extension: photo with various designsOptions for building and decorating a lot of nails. Consider the most popular. 3D modelingThis is not an easy way to nail design, as long-term work is needed. Gel for 3D modeling holds its shape remarkably well, it does not crack and does not spread.
Of course the process of performing 3D modeling is very laborious. Each layer is not complete without painting or accessories in the form of acrylic flowers, curlicues, decorations, which are formed by a brush. Art paintingToday it is the most frequently used technology for decorating nails. In this design, gel polishes, watercolor, acrylic paints are used.
Drawings are applied with a needle, thin brush or sponge. To create a geometric pattern, use strips on the basis of glue. The most frequently used designs include Zhostovo, Chinese, Gzhel. Stamping manicureTo apply the pattern on the nails, apply a specially created plate-stencils. This is probably the easiest way to create a complex and interesting design. Stamping manicure looks bright, catchy, spectacular.
Often, stamping is used to model a wedding manicure in the form of lace. The leader among manufacturers is Konad. Combined designA professional nail art artist can masterfully combine various types of design at the same time.
The result is a very beautiful manicure options. How much does nail gel in the salonOn average, the price of increased gel nails in the salon varies from 1,200 to 6,000 rubles. In some stores, this price does not include, for example, design. It is paid separately and depends on the complexity. If the price in the salon is less than 1000 rubles, then most likely the client will receive poor-quality and unstable manicure, as in this case cheap and low-quality materials are used. Gel nail extension: video tutorials for beginnersThe training video building gel nails from scratch. Video tutorial for beginners How to grow nails: instructions for dummies. Watch useful video: |
 This procedure, like any other, has positive and negative aspects. Therefore, before deciding to gel nail extension, you need to carefully analyze everything.
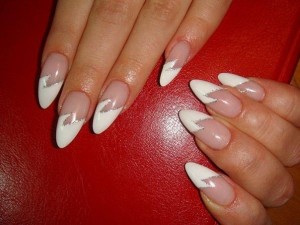 Technique of gel nails on this material requires special attention and the availability of tools. Split nails are made in the following way:
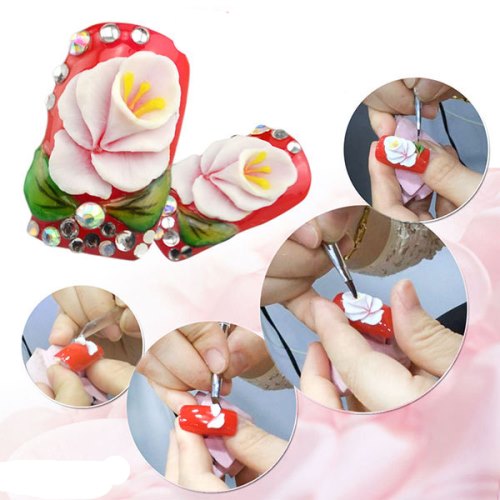
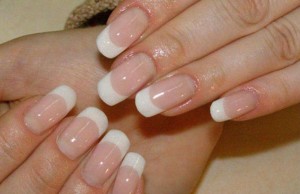 Sculpting volumetric design. 3D drawings will not only serve as an excellent decoration, but also add originality to the image (photo 1).
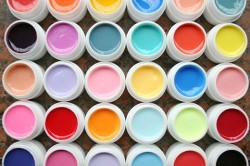

| Read: |
|---|

New
- Sequence of procedures
- The program of intensive moisturizing of the skin on cosmetics bark
- What you need for acrylic powder
- What does owl mascot mean
- Analyzes for pancreatitis: what research should be done and what indicators show
- Owl - a talisman to attract money and good luck
- What bird screams at night with a kitten's voice?
- Cholesterol and stress
- Manicure at home
- Effective facial


